- AUDIO ONE-TO-ONE Call Now: 210-805-9927
- Contact
- Register
- My Account
HOW TO IMPROVE YOUR SYSTEM FOR FREE (Almost!)
What is likely to be the single most neglected part in an audio or video system, is also one of the most important - the connections. The tiny junctions that allow for temporary electrical connection between components, present a considerable obstruction to the meager flow of electrons we recognize as sound or picture. A dirty connection can detract, most dramatically, from the performance of even the most carefully planned audio or video system. Many among us simply plug in our cables and/or equipment and forget them - an unfortunate circumstance that should be avoided at all costs.
Over the years we've come to realize the important role cables play in system performance. Expensive cables have become commonplace, with prices approaching that of many components. Indeed, the sonic potential of the system hinges upon the quality of the interconnection. With our attention focused upon the cables, we've unfortunately overlooked the weakest link in the chain - the connection itself.
With the extremely small, fragile voltages carried by the signal cables between system components, the additional resistance and capacitance of the connection becomes an important factor. A poor quality connection will dramatically degrade the vanishingly small signals that attempt to traverse this barrier. This is especially true in the cartridge to preamp run where voltages as low as 0.2mV are common, or at the very high frequency range of the digital or video interface. Here, especially so, degradation caused by a poor quality connection will result in a greatly diminished listening/viewing experience. And the effects are easily measurable.
During a conversation with a noted equipment manufacturer I happened to mention I was writing this article. He agreed it was a critically important topic, adding that measured performance is significantly impacted by soiled connections and that thoroughly cleaning contacts on both the component and the test equipment leads was mandatory prior to final testing.
Before we proceed with instructions on how to go about servicing the connections in your system, let us examine the junction itself, attempting to define the problems we face.
An ideal connection would be one that is absolutely clean and gas-tight. Here, air is unable to penetrate the junction, preventing the intrusion of dust, dirt and other airborne contaminants that could oxidize or otherwise foul the connection. High termination pressure facilitates optimum mechanical contact between mating surfaces. Unfortunately, the basic design of both the RCA and XLR connectors common in audio systems today, fall well short of that ideal. While a truly gas-tight connection is a virtual impossibility, the closer we can approximate this level of mechanical/electrical integrity, the less degradation there will be. We are clearly aided by efforts of modern day high end Manufacturers who have made tremendous strides in improving the lowly RCA (and to some extent, the XLR), with upgraded materials, precision construction and careful attention to detail. Their work is to be commended. However, we must do our part to insure a clean, tight connection if we expect to realize the full benefit of these improvements.
The single most important thing you can do to insure a viable connection, is simply to clean all mating surfaces. You know the old adage - cleanliness is next to Godliness - here we might modify that statement to read: cleanliness is a mandatory prerequisite to optimum performance in any audio or video system. Unfortunately, many obstacles stand in our way.
Your brand new cables, fresh out of the box, are not worthy of connection in your system! Why? A variety of oils and chemicals are used in the manufacture of connectors. Only a cursory attempt has been made to remove these contaminants before the connectors are affixed to your cables. In much the same way that mold release compound must be removed from LPs and CDs for best performance, we need to remove this manufacturing residue from the connectors prior to use. Have you done this?
Clean, tight connections are essential to optimum performance! I cannot stress this fact too strongly.
I firmly believe that cleaning all the connections in a high end audio or video system is absolutely imperative if you expect anything approaching full performance potential.
Now that I’ve verbally abused you for your past misdeeds, let me help you achieve redemption. Let’s examine the process of cleaning in detail, investigating available cleaning agents and the application techniques necessary to insure optimum results.
YOUR WEAPONS -
Solvent -
The perfect solvent would scrupulously clean the surface, leaving zero residue. Over the year’s people have used a wide variety of solvents to clean their connectors, a few work well, most perform quite poorly. While there are many products available designed to clean the contact surfaces of electrical connections, few have found favor with the audiophile community. Years ago Freon TF was recommended, and worked quite well, but this chlorofluorocarbon has been phased out due to environmental considerations. In today’s world there is a proliferation of products sold under the badge of contact cleaners or electrical cleaners. Most we’ve seen are too aggressive, with toxic solvents that may be unsafe on the various materials used in modern cables and connectors. The rest leave behind a residue which imparts a telltale sonic signature.
Our choice is 99.9% lab grade isopropyl alcohol. This ultra-pure product dissolves a wide range of compounds (especially oils), evaporates quickly and leaves no residue. For many years it has been widely used and trusted as an effective solvent for cleaning electrical contacts. There are many suppliers for 99.9% alcohol, we’ve been happy with MG Chemicals offerings, which you can  purchase on Amazon, with a 4.2oz bottle going for under $10. Here is a link to that page.
We suggest a dedicated dispenser for the alcohol for a couple of reasons. First, you do not want to contaminate your pure solvent with fibers or residue from your cleaning tools. Second, alcohol is volatile, evaporates quickly and is flammable. An uncapped bottle of solvent readily evaporates and is easily spilled, causing damage or creating a dangerous situation. Labs and doctor’s offices use small pump dispensers that work well for the application. There are a variety to choose from and you can search online for one you like. Here is an inexpensive option from Menda available on Amazon.
Note: Connectors that are extremely oxidized can be first cleaned with Caig De-Oxit, which is excellent at removing this crud. However, it is absolutely IMPERATIVE that this treatment be followed by a thorough cleaning with alcohol as we've found De-Oxit leaves a residue that results in a tizzy, grainy and hard sound.
Cleaning Tools -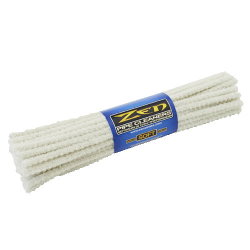
In addition to your 99.9% Isopropyl, you’ll need: Q-Tips (the ones with paper stems), non-shedding pipe cleaners, a clean, lint-free cotton cloth and a small brush (optional). You may need some additional tools if you need to tighten any connections (more on that later).
Q-Tips of course are ubiquitous and can be found at any supermarket or drug store. Just be sure you are buying the ones with the white paper stem, rather than the ones with a blue plastic tube stem. I have also found that sticking with the Q-Tip brand is a good idea. The cotton tip on some of the cheap knock offs I’ve tried tend to come off or shred easily.
In many cases the item most difficult to find locally are good quality pipe cleaners. Most grocery-store brands are poorly made, shed excessively or use synthetic fibers. You will likely find good quality all-cotton cleaners at a tobacconist who specializes in pipes. We’ve used the Zen brand, but I’m sure there are many brands that fit the bill. Here is a link to an Amazon seller offering the Zen pipe cleaners.
One further note, your solvent is a cleaner, not a preservative or treatment. Use it simply as a cleaning agent, and along with the abrasive action of the cotton swab, it will scrupulously clean your connections.
THE PROCEDURE:
RCA CONNECTIONS -
Male RCA - First, check for a good, tight connection. If the male connector is loose when connected to the female, some outer ground flanges of the male plug are likely not gripping the exterior of the female RCA. With most male RCA connectors, it is possible to tighten the grip force by adjusting the ground flanges using a jeweler’s screwdriver or a pair of small needle-nose pliers or small screwdriver to subtlety bend these flanges inward. Note: With the vast number and types of RCA designs on the market, the ones on your cables may or may not have any adjustability. Only attempt this step if you are certain the RCA plugs on your cables are constructed in such a way to allow this. An example of one technique used with RCA connectors from Wireworld is shown at the end of the article.
First, some general guidelines. You will see that we are adamant about cleaning each connector at least twice. This is an important step as most soils are not readily visible. The first time you clean a connector you may not see any discoloration on the cleaning tool, but there is surely some there. The second cleaning – with a fresh cleaning tool – insures that the contact is spotless.
You’ll also note that we emphasize using a fresh tool every time. Reusing a cleaning tool simply re-deposits the soils back onto the connector and dipping a dirty tool into your cleaning solutions spoils its purity. For that reason, we do not recommend the cute little custom-designed cleaning tools sold to audiophile community. While they are no doubt convenient and effective, most people use them until they are blackened. Unless you are prepared to use these one time – and one time only – do not use them.
Now let’s clean.
- Remove most of the cotton from the end of a few Q-Tips (again, use the ones with a paper stem, rather than the plastic tube). This partially denuded Q-Tip fits perfectly into the space between the positive (hot) and the outer ground flange on the male RCA connector. Experiment to get a feel for how much cotton needs to be removed to fit snugly into the space.
- Apply solvent to one of your "modified" Q-Tips. Insert the Q-Tip into the area between the ground and hot conductors of the male RCA. Rotate the Q-Tip around and around several times. Repeat this process (using a new Q-Tip each time) until the Q-Tip comes away visibly clean.
- Re-clean the connector one final time using a new Q-Tip. This is extremely important! It is this second, final cleaning, that pays the biggest dividends.
Female RCA - Check for a tight fit between the male and female connectors. Tightening the inner (hot) conductor on most female RCA's is a bit tricky, but can be done with a small jeweler’s screwdriver and a great deal of patience. As noted before, so not attempt this step if you are not sure of what you are doing. Screwing up a female RCA mounted to back of a component could result in an expensive repair.
- The external (ground) portion of the chassis-mount female RCA can be cleaned with a Q-Tip treated with cleaning solution or a small cotton cloth. Again, go over the surface as many times as necessary until the Q-Tip comes away visibly clean. Then clean once more.
- The inside (hot) conductor of the female RCA is a bit more difficult to clean. I recommend using a lint-free cotton pipe cleaner for this purpose. Be sure to clip off the used part of pipe cleaner after each use so you have a clean, unused tool for every step.
- Re-clean a second time. Important!
BNC and XLR - Basic process as above. Clean all mating surfaces.
SPEAKER CONNECTIONS -
Speaker terminals and amplifier binding posts are much easier to clean than RCA connectors, simply because they are larger and easier to access. Use solvent and Q-Tips to clean all conductive surfaces. A small brush may be helpful in removing stubborn debris if the connectors are heavily soiled.
Be sure to clean the female receptacles in the back of the binding posts if your cables are terminated with bananas. Clean the spade lugs with a cotton cloth dampened with solvent.
OTHER CONNECTIONS -
Within most systems exist many more, sometimes hidden, connections that should be cleaned. Basically, any and all electrical contacts should be cleaned. These include:
Cartridge pins and headshell leads, DIN connectors on tonearms – Far and away the connection most susceptible to the degradation caused by dirty contacts would link between the phono cartridge and preamplifier. The ultra-low level signal produced by the phono cartridge should see a minimally restrictive signal path, and clean tight connections are super important. Cleaning the tiny cartridge pins and clips can be difficult, but it is important. We've found that toothpicks moistened with alcohol can be used for cleaning cartridge clips, Q-Tips or pipe cleaners work well on the cartridge pins. Exercise caution when cleaning the cartridge pins to avoid getting alcohol on the cartridge body itself.
Tube pins and sockets – Tube pins are notoriously nasty, especially NOS tubes which may have been sitting for years. These may require a bit more attention if they have oxidized. Tube pins can be attacked with Q-Tips and a solvent-dampened cloth, use pipe cleaners on the sockets. Caig De-Oxit is an option, but remember to re-clean with alcohol. Some tube devotees have suggested using Emory cloth on heavily oxidized pins to remove particularly stubborn deposits.
Fuses and fuse holders – Though less susceptible to degradation due to the much higher voltages they pass, we still recommend cleaning these contacts; every little bit helps.
Phono ground lugs – The ground screw terminal on your phono preamp should be easy to get to.
Male and female ends on power cords, IEC power receptacles on components – We’ve been surprised by the amount of improvement we’ve heard by cleaning the full power delivery chain. Q-Tips or cloth moistened with alcohol work well on the exposed blades of a cord-end plug, use pipe cleaners for the recessed connections of the cord-end IEC. The exposed blades of the chassis-mounted IEC power inlet can be cleaned effectively using Q-Tips. Prior to installing upgraded wall outlets, clean the internal mating surfaces and the external screw terminals.
Plug-in connections within the components themselves on circuit boards and internal power supply wiring connections - Note: Do not attempt to clean anything inside components unless you feel qualified! You could be dealing with potentially dangerous voltages. Be certain that you unplug all components, allowing their power supplies time to discharge overnight, before attempting any internal cleaning. Generally, I’d tell most audiophiles to leave this step out of their cleaning regimen.
CLEANING FREQUENCY -
I have found that optimum performance is maintained if you repeat the cleaning process twice per year. The frequency will depend on environmental factors, the resoloving ability of the system and the auditory acuity of the listener. The more air pollution and dust present, the more often you will want to clean. This is especially true if there is a smoker in the home.
FINAL NOTES:
- Remember to clean each contact until the cleaning tool comes away visibly clean, then clean once more.
- Use a fresh Q-Tip (or clip off the used part of a pipe cleaner) for each step – never reuse a cleaning tool.
- Do not contaminate your bottle of solvent by dunking a Q-Tip or pipe cleaner – use an appropriate dispenser to prevent contamination.
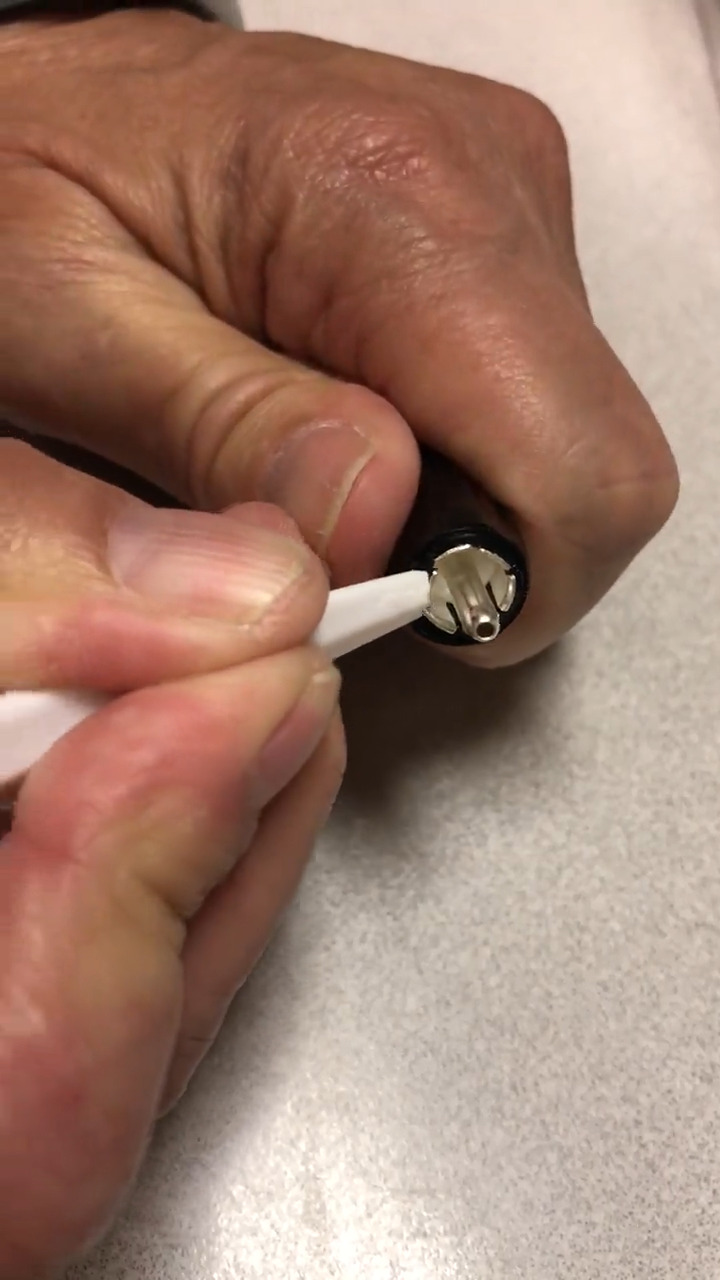
Tightening the ground flanges on a Wireworld RCA connector