- AUDIO ONE-TO-ONE Call Now: 210-805-9927
- Contact
- Register
- My Account
TONEARM/CARTRIDGE COMPATABILITY
For best performance, the tonearm and cartridge should be matched. All cartridges will not work with all tonearms, and vice versa. To insure a proper match, one must be aware of the mechanical specifications of both the arm and phono cartridge. To see how these characteristics interact and determine compatibility, let's explore the dynamics of the relationship.
Any cartridge/tonearm combination will exhibit resonance at a specific frequency (or frequencies). This resonance is due to the interaction of the cartridge (acting as a spring), and the weight of the arm (acting as a mass). The "springiness" of the phono cartridge is described as compliance, the weight of the arm is specified in mass. As an example, a heavy weight on a light spring would obviously over-flex the spring, conversely, a light weight on a strong spring would not allow sufficient flexion.
At resonance, the arm/cartridge combination produces a dramatic rise in output. An increase of 3 to 6dB or more is common. This tremendous boost can cause severe problems if it occurs in the region of recorded music (above 20Hz), or in the area where record warps and rumble are problematic (below 5Hz). A cartridge/arm whose resonance occurs in the region above 20Hz can be influenced by music on the record. At this frequency a significant jump in output (resulting in a "bloated" or "tubby" sound) will be experienced. In extreme cases, the stylus may actually jump out of the groove. Similarly, a cartridge/arm combination that exhibits a resonance below the desired range will exaggerate the effects of record warps, or rumble produced by the turntable.
The goal in matching a specific cartridge and arm is to achieve a resonance in the 10 to 14Hz range. Some feel that limiting this range even further, to 9 to 11hZ, is best.
For those of you with a mind for numbers, I've seen the following formula for calculating the resonant frequency of an arm/cartridge pairing: Resonant Frequency = 1000/[6.28*square root (M*C)]. Where M is the mass of the arm and cartridge and C is the compliance of the cartridge. As an example, if we had an arm/cartridge with a combined mass of 14g, and a cartridge with a compliance of 20, the resonant frequency would be 9.535.
This simple equation doesn't take into account all factors, including tonearm damping and, internal cartridge damping, but it will give you general idea of compatibility.
In the 1960's and 1970s, high-compliance cartridges were the rage and these needed to mate with very low mass tonearms. That began to change in the 1980s when heavier, lower-compliance phono cartridges (especially moving coils) became more popular, requiring tonearms of medium to high-mass. Further, some of the currently available MC cartridges put back a tremendous amount of vibrational energy into the arm. This reflected energy takes the form of standing waves, which travel up and down the length of the tonearm, potentially creating mis-tracking problems and/or frequency dependent cancelation. A well designed tonearm will dissipate this energy, rather than reflecting it back to the cartridge. The ability of the arm to accomplish this will be dependent upon bearing design, internal damping, rigidity and other mechanical design considerations.
In a situation where a higher compliance cartridge is employed in a medium to high mass tonearm, the ill-effects of the mismatch can be mitigated to some degree if the tonearm offers fluid damping. Here viscous silicone fluid damps the arm motion, restricting small, rapid movements (like the small undulations that would occur in a high-compliance cartridge), while providing unrestricted progress to the arm as it slowly traces across the record. This system also may improve the sound of some phono cartridges that offer little internal damping of their own.
The only way to accurately measure system resonance is with a calibrated low frequency test record and a chart recorder, or other sophisticated test equipment. Since most of us do not possess this capability, it is wise to do some preliminary homework in assessing the compatibility of any potential arm/cartridge combination. There are a few general "rules of thumb" that we need to consider:
* A tonearm whose effective mass is rated at 10 grams or below is considered low mass (e.g. early SME’s, Grace 747 etc.). A tonearm whose effective mass is rated between 11 and 25 grams is considered moderate mass (e.g. SME 309, IV, IV-Vi, V, Triplanar, Graham). Arms above 25 grams of mass are high mass in nature (Eminent Technology, Dynavector).
* A phono cartridge whose compliance is rated at 12 x l0ˉ6 or below, is considered low compliance. A cartridge whose compliance is rated between 13 x l0ˉ6 and 25 x l0ˉ6 is considered high to very high. Note: Another way of expressing compliance is um/mN. Here a rating of 5 to 10 is considered very low, 10 to 20 is moderate and above 35 is very high.
* Low mass arms mate well with both moderately high and very high compliance phono cartridges.
* Moderate mass tonearms are good companions for moderate to low compliance cartridges.
* If a low compliance cartridge is used with a low mass tonearm, undesirable resonances can occur in the audible range. Mis-tracking may also be a problem.
* When a high compliance cartridge is mated with a moderate mass tonearm, resonances in the infrasonic range may occur in addition to some unwanted high frequency damping.
It may not be possible in every case to accurately determine whether a particular cartridge is suited to a given tonearm by a simple glance at the specifications. This is especially true in border-line situations. However, poor combinations can be easily identified and avoided.
Several variables can influence our ability to accurately predict a match using the manufacturers supplied specifications. Some of these are: 1) The manufacturers specifications themselves can vary in accuracy due to differences in measurement techniques. 2) Sample to sample variation of the cartridge. 3) Differing amounts of internal damping of the cartridge or tonearm and 4) the age of the cartridge. The situation is further complicated by the fact that we should calculate both vertical and horizontal resonance points.
Happily, most of the popular, modem-day moving coil (and many moving magnet) cartridges and the current crop of medium mass tonearms represent a fairly good match. Exceptions do exist however, and we should be aware of the sonic pitfalls. An improperly matched cartridge and tonearm will not only sound poorly, it may even cause irreparable damage to records and stylus. So, it is well worth the effort in preliminary comparisons to determine the compatibility of the proposed cartridge and tonearm.
For further help in determining whether a particular cartridge is a good match for a given arm, consult the graph below (courtesy Ortofon).
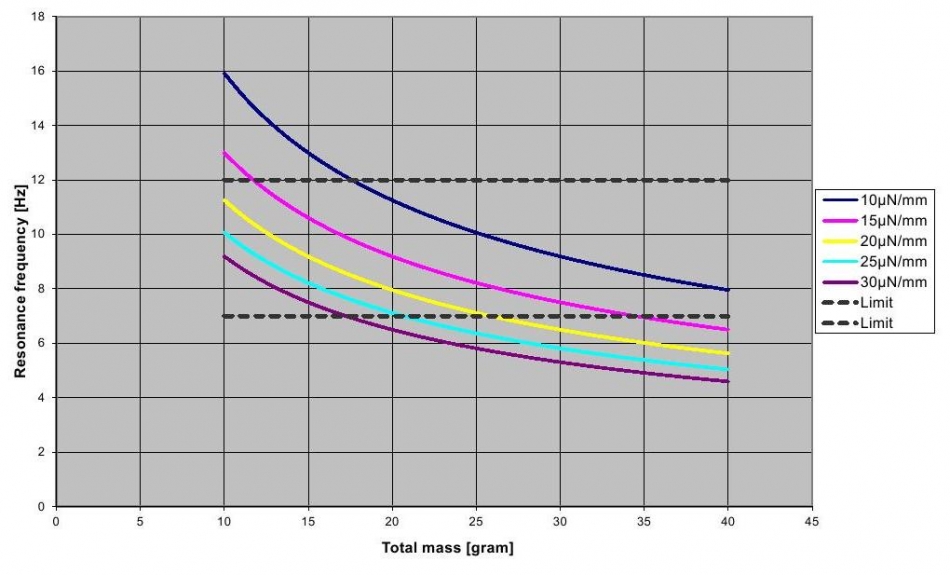
Total (tonearm system) mass can be calculated by using the formula M = 10⁶ : (f² x (2π)² x C where:
f - Cartridge resonance frequency in Hz
π - 3.14159265359...
C - Cartridge compliance in µm/mN
NB: Total (tonearm system) mass M is a sum of Mass of cartridge, Mass of headshell and screws and Effective mass of tone arm (all values in gram)